Montessori Grammar Boxes: What they are and how to use them!

When it comes to Montessori Elementary language work, nothing feels quite as overwhelming to homeschooling parents as the Grammar Box Materials! That’s why I am dedicated to showing you that this amazing resource is really not as complicated as it seems! Before you get started with any material for your children ages 6-12, I recommend reading a good theory album like the one from Keys of the Universe. This will give you a good understanding of the method so that you can better decide which materials will best suit your individual children.

This post is long and detailed because I wanted to make sure I explained everything for those who have asked me to! But if you feel too overwhelmed by all this information, head over to YouTube to watch my latest video where I explain these materials in depth, using the version that I created for our home environment. I’ll also be giving you just a quick look at our homeschool space to show you how we display these materials at our house.

Grammar Boxes: What are they exactly?

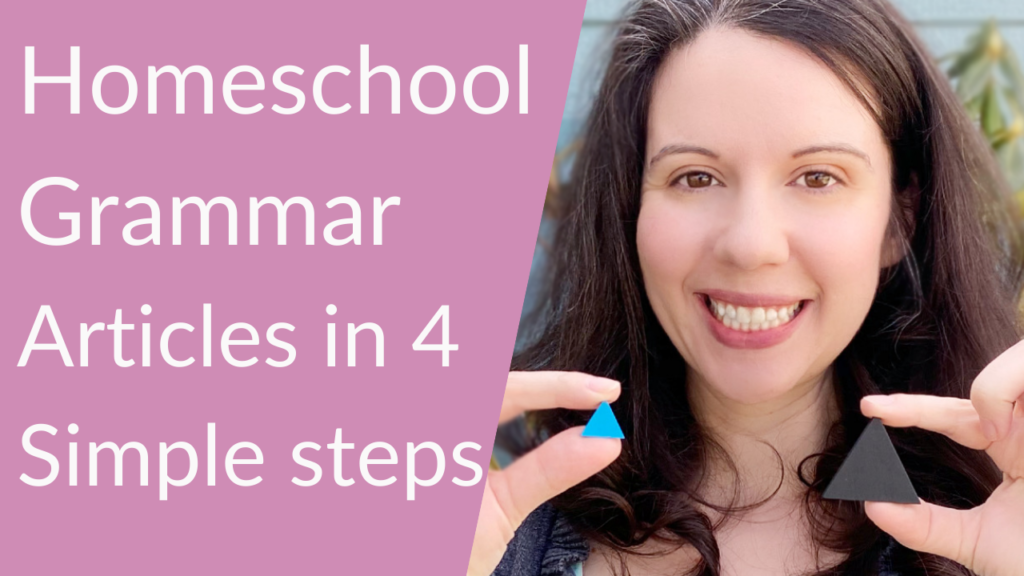
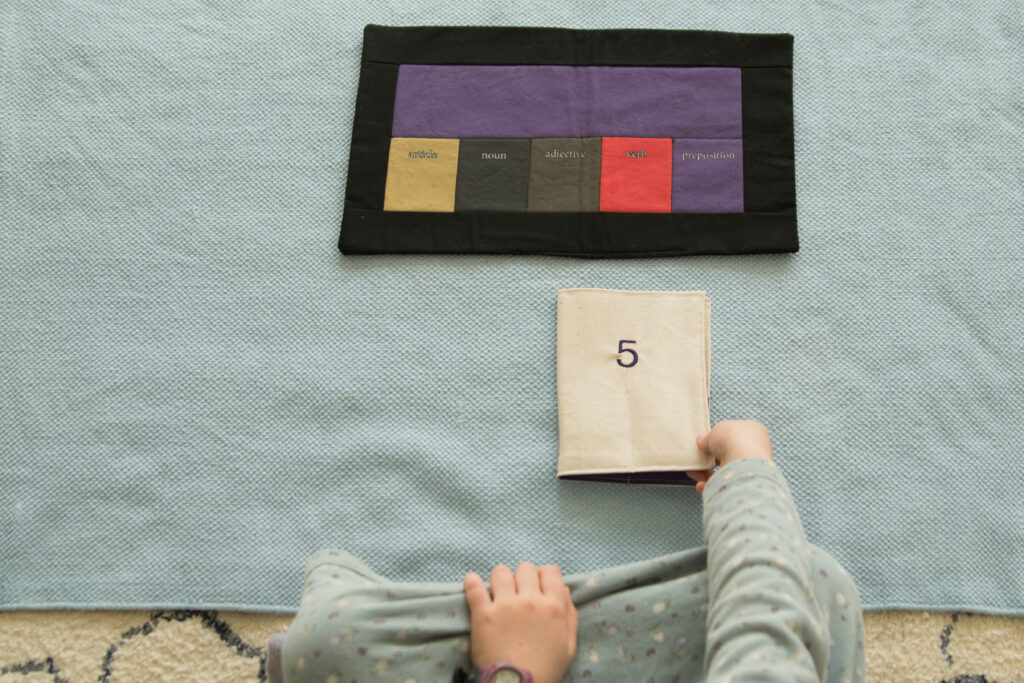
The Montessori Elementary Grammar Boxes are a series of…well, boxes, which are used to house and sort the Grammar Card Materials. The idea is that once a child has a lesson (often called a Key Experience) to teach a part of speech, the Grammar Boxes are used to give the child more practice with the concept by building phrases or sentences using the parts of speech they have learned. The series begins with box 2, which houses two parts of speech–article and noun. There are three types of boxes in the Grammar Boxes set, so let’s talk about the role of each.

The first are called the Grammar Filling Boxes. These are 36 wooden boxes which are color coded according to the part of speech that the child will focus on. Each box has a progressively more complex set of phrases and sentences and individual word cards, which are used to rebuild the sentences (more about that later).

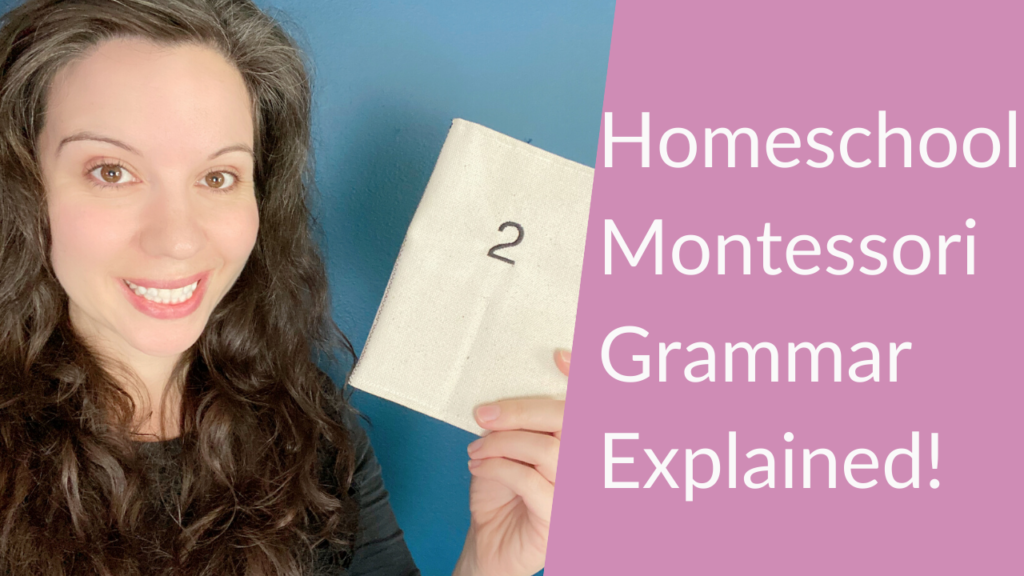
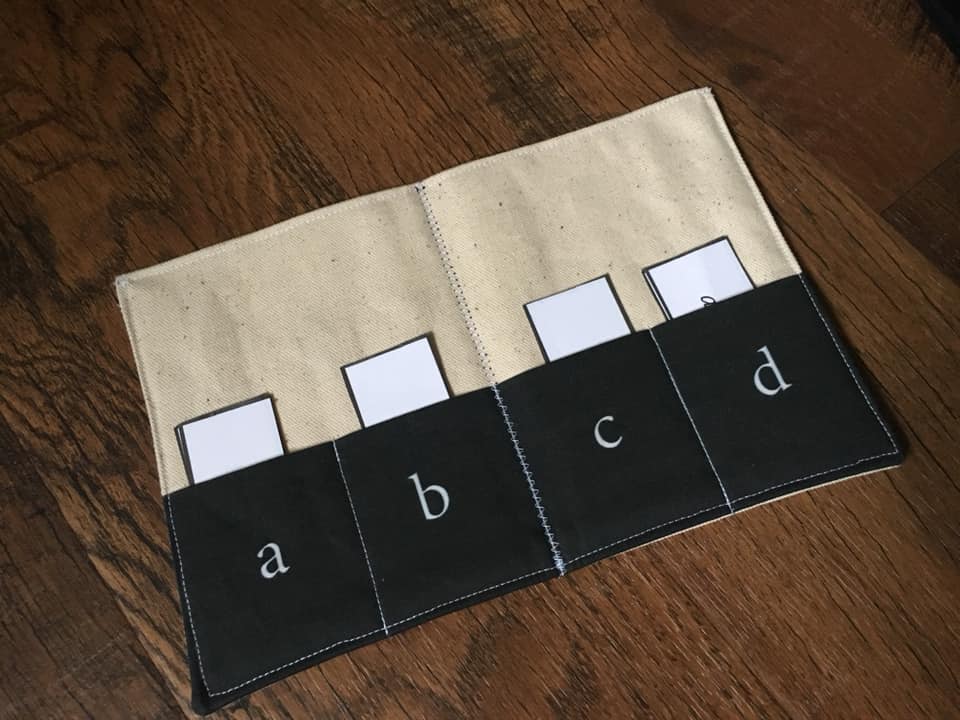
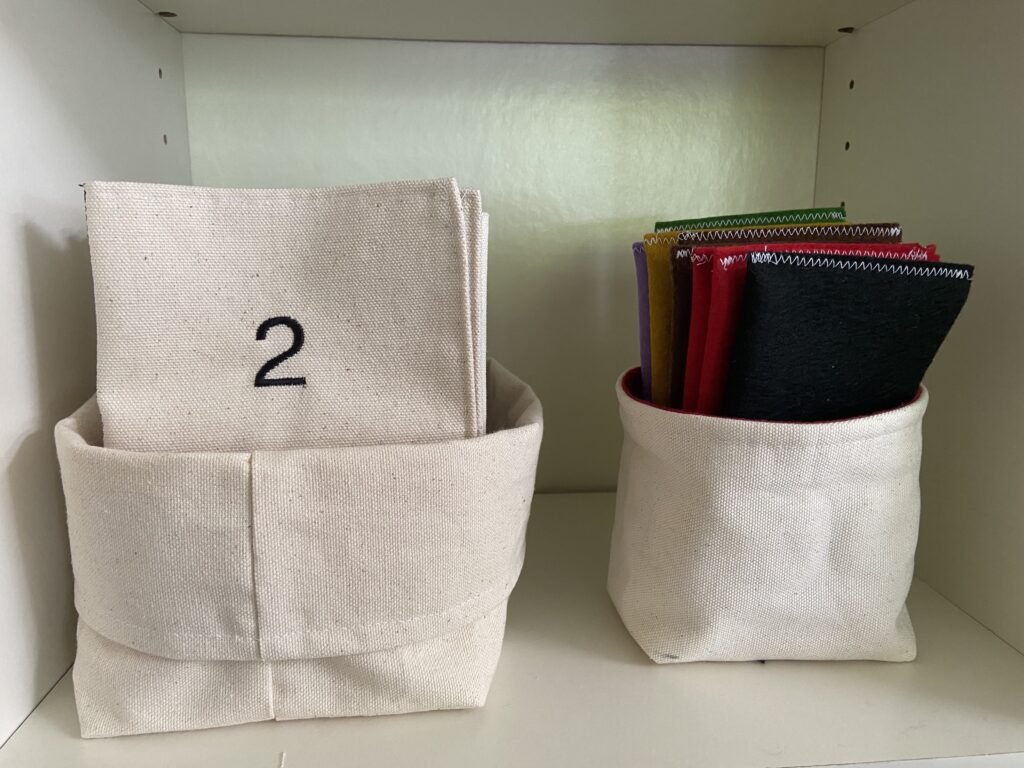
The set that I make is a little different. Instead of all those wooden boxes, I make 8 organic canvas envelopes, each with an embroidered number on the front, which tells you the number of parts of speech studied in that set. Each Envelope is like a small folder with labeled pockets inside. So for example, instead of 4 wooden boxes for the noun-article set (Box 2), I created one envelope with four pockets. I also make a canvas bin for these to neatly sit inside on your shelf.

Instead of four wooden Filling Boxes, I make one organic envelope with four pockets.


The second type are the Sorting Boxes, these are used by the child to sort out the card material when using the materials found in one of the Filling Boxes. There are 8 of these boxes, each one adds a new part of speech. The first Sorting Box has two parts of speech (noun and article) and so it’s commonly called Box 2. There is no Box 1, because if there were, it would be the study of nouns and we can’t make phrases/sentences with only one part of speech.

Instead of large and bulky boxes, I created a set of Grammar Box Mats, which are made with organic cotton. These are just as beautiful as the wooden version, but can be stacked on the shelf, and take up much less space! I also make a printable version of the Grammar Box Mats for those who are on a tight budget.

Grammar Box mats are beautiful and stackable!

The third type are the Command Boxes. These boxes are open on the top and hold Command Cards and Exercises, which are fun activities/actions for the child to do to practice each part of speech through commands/actions. In other words, they tell the child to act out a part of speech in some way. There are typically nine of these boxes, one for each part of speech, and two each for the adjectives and verbs.

Instead of wooden boxes, I made Command Box Envelopes. I left these open on the top to mimic the original box design, and used the traditional colors in vibrant organic wool felt. I also make a small canvas bin for these envelopes so that they are easy to display on your shelf. My children LOVE these.

All the Grammar Box Filling Envelopes and Command Box Envelopes fit inside one small Ikea cube shelf.

Grammar Card Material: What does it include?

Now that we understand all the boxes, let’s talk about what goes inside of them! Each Filling Box contains a set of phrase/sentence cards AND cards which have the individual words contained in those phrases/sentences. The word cards each have a different color depending on which part of speech they are.

As I said above, after a child has had a Key Experience Lesson (this is a creative introductory lesson) on a part of speech, they use the Grammar Box materials to practice building sentences and phrases using the parts of speech that they know about. As they progress through the series of boxes, the exercises get more complex and include more parts of speech.

Need help teaching the key experience lessons? Check out my grammar tutorials! I show you exactly how I taught them to my children to give you an idea of what might work for yours.

My Grammar Card Material is a little different from the traditional set in two ways.

The first is that although I based the cards on what is included in The Advanced Montessori Method, I modernized the language and changed all the references to Montessori Materials to common objects so that they are useable by everyone–not just fully equipped Montessori schools. So for example, if a Command Card asks a child to do something like move a part of the Pink Tower or Brown Stair, I changed the noun to be something else that everyone will have on hand, like a wooden block.

The second way that my Grammar Card Material is different is that it is not as extensive. I cover all the same topics of study, but there are fewer exercises for each concept. I think you’ll find that you will have plenty of material to work with (even this abridged version is 219 pages), and your children will love the blank forms I included for them to use to make up their own sentences and commands. (These were my children’s favorite part, they loved customizing their set with beloved stuffed animals and other special objects from our home.)

Whether you choose to buy the traditional wooden materials or my fabric set, I hope that this information helps you to feel more confident about teaching grammar to your children at home! If you have questions, please leave me a comment!


Montessori Math is Golden!

These Two BIG Bead Layouts Teach About Quantities and Symbols

In this video I’ll show you two layouts using the Golden Bead Material.

Hooray! I have just added another Montessori Math video to my YouTube channel! This is the next part in my series explaining how we taught place value, quantity and symbols (numerals) using the Golden Bead Material (my favorite) at our house!

In my previous videos, I explained how we taught quantity using the beads, and symbols using the number cards. In this video I show you how we put it all together in two big, exciting layouts. Your kids will LOVE building these big numbers and the whole decimal system will click for them when they see it all laid out.

My hope is that these videos will make Montessori Math feel more doable and less complicated for homeschooling families, because I think it is such an amazing way to give children a deep understanding of mathematical concepts. So check it out and let me know what you think!

Looking for the material list? Here it is!
Golden Bead Material
Low-cost Printable version (includes cards, beads and small place value mats)
45-Layout Mat
PDF of the lessons in detail

Awesome Adjectives and How to Teach About Them!

Teaching about grammar with worksheets is probably one of the most overwhelming and boring things homeschool parents face. It’s right up there with higher level math! (Which I also love teaching, because I’m a huge nerd.) But it doesn’t have to be all meltdowns and tantrums (by teachers or students), it can actually be fun and memorable and easy. Enter our grammar savior, the Montessori method! (I’m cheering, are you?)

Come see how I taught grammar to our children!

I started a grammar series on my new YouTube channel in March, and if you’re feeling overwhelmed by how important and significant and scary grammar is to teach, I invite you to come and take a look at how we taught it to our children. I think you’ll find that it’s very doable and that while the excitement you experience may not be roller-coaster- level, it can be enjoyable.

Here is the material list for the Adjective lessons:

Adjective PDF: This includes the lessons written out for future use and reference, as well as the blank cards, paper versions of the mat, and grammar symbols.

Grammar Box Set This is everything you need to teach all the parts of speech! It includes the Grammar Box Sorting Mats, Grammar Box Filling Envelopes, Command Box Envelopes and all the card materials. I also sell the Grammar Sorting mats and Grammar Card Material as printable downloads.

Detective Adjective Game from Samca Montessori

Montessori Math at Home: The Card Layout Lesson

Watch my YouTube Tutorial to see how we taught the Montessori Card Layout lesson

Place value lessons don’t get as much attention as they deserve. This super important foundational skill will save your child years of struggle down the road.

Materials you’ll need for this lesson:

Lesson PDF
Number Cards
Place Value Mat OR
Printable Version of the Mat, Golden beads and Cards

Anyone out there remember “carry the 1” and “borrowing” from when you learned math in traditional schooling? Instead of teaching mindless steps, give your child a concrete understanding of the foundations of math and set them up for a lifetime of success!

Watch my latest video showing the Montessori Card Layout lesson, and then you’ll be ready to teach your children all about place value. This is the second video in my Montessori Math at Home series. Next time I’ll show you how we use the beads and cards together, so be sure to subscribe!

More Montessori Grammar at Home: All About Articles

Want to feel more confident about teaching grammar lessons to your children at home? Head over to my YouTube Channel to check out my second video in my elementary grammar series. This video is all about articles, and I hope you love it!

In addition to the video lesson, I’ve created a handy PDF for you to download and use while teaching your children. The PDF goes through the lessons step-by-step, and includes a printable version of the grammar materials.

Looking for more grammar goodness?
Here’s a list to get you started:

Sensory Sensation: The Simple Joy of Play Dough

Made with love, this play dough is soft and squishy.

It’s finally spring in Washington state, and we have had some truly blissful days in the garden already. Last week, we spent nearly every moment outside in the backyard. We even took all of our school work and meals outside so that we could feel the soft breeze and feel the sun on our skin.

But this week, it is raining. Pouring in fact, every day for the last four days. You know what they say about April showers, at this rate I’m expecting lots of May flowers! And while we are not at all against playing outside in the rain, it can be cozy to find some fun inside things to do as well. Which brings me to the point of this blog post–play dough.

Last weekend at church the children’s teacher let the kids squish some play dough and make objects from the story as she was telling it. It was a big hit, and it reminded me of just how sessional the sensory experience of play dough really is. That texture! Nothing compares to the feeling of squishing it between your fingers. But there is one thing that I hate about play dough, and that’s the smell. Which is the number one reason that I make my own!

So I surprised my children by leaving some colorful balls of dough for them to discover on the kitchen table. I know my kids, so I knew they would be thrilled with it. I chose to set out only primary colors because I wanted to see if they would remember how to make secondary ones–they did (proud mom moment)! Want to make some play dough for your kids? Here’s the recipe I use! You can make it yourself and surprise them, or involve them in the process–just be careful with the hot water. I like this method because it doesn’t leave me with a terrible sticky pot to clean and even young children can mix the dry ingredients without fear of injury.

Yellow and blue makes green. Gotta love playful learning!

Super Silky, Soft Play Dough:

Ingredients:
1 cup flour
1 cup water
2 tsp cream of tarter
1/3 cup salt
1 TBS vegetable oil
gel food coloring (optional)

Directions:
In a large bowl, mix flour, water, cream of tarter and salt.
Bring water to a boil
Add vegetable oil to water
Add oil and water mixture to flour mixture, stir to combine
Add in your color at this stage if you choose to add some
Turn dough onto a protected surface (I use a silicone mat) and knead until smooth.

Tip: If your play dough dries out a little during play, just add a little coconut oil to it and knead it in, it will return the dough to its soft, playable state.

After the novelty of the dough itself wears off a little, you may wish to add cookie cutters, rolling pins, and other fun tools. You could also offer add-ins such as dried flowers (we have lavender), beads, dry noodles or legumes like lentils, split peas and beans!

Have fun and enjoy your rainy day!


Not -Another- Snow- Day Learning Trap

Caught in a Learning Trap. They didn’t stand a chance.

We have had snow, snow and more snow up here in the Pacific Northwest this month! And although I love the white stuff, I’ll admit that all the bundling, sledding and trudging though the snowmageddon we’ve been enduring this February is getting a little old.

Even worse, I noticed that this week my two children who usually LOVE the outdoors and ADORE sledding are opting for more inside play. And while that’s totally fine, I really like to encourage them to get outside as much as possible!

With this in mind, I decided that this week’s learning trap was going to need to be something that would reignite the delight they have for snow. I really wanted to recapture that joy that comes with the very first snowfall of the year. You know the joy I’m talking about, it’s the excitement you hear in their voices when they exclaim “LOOK! It’s SNOWING!”

Because I wanted my learning trap to be extra effective and super sticky, I observed my kids and took notes first. I watched carefully and asked myself, “What is it that’s capturing my little boys’ attention this week?” I saw tinkering, lots of drawing and creating. I also saw mixing and baking and stirring. And…I’ve got it! Time to set the trap.

Learning traps are super sticky, sensationally superb, learning opportunities that children can’t resist. And what makes them so irresistible is the ridiculous amount of research that goes into setting the trap.

Probably you’ve heard of mud kitchens, right? Well earlier in the week I saw another mamma on Instagram (firebirds_and_warriors) who had set up a beautiful mud kitchen for her kiddos and I thought, that’s exactly the kind of thing that my kids really are craving right now. Only…DESPAIR…there’s no mud here.

So then I thought in my little head “Jennifer, you better work with what you’ve got, and bloom where you’re planted, stop feeling sorry for yourself about the fact that you have two feet of snow at the end of February and make something of it.” Or something to that effect anyway… I often give myself little pep talks…but I digress. My point (I’m getting there, I promise) is that this is what inspired my newest learning trap–SNOW KITCHEN.

Use objects that will captivate your littler learners based on their current interests.

Maybe you’d like to set one up too! And if you don’t have snow, use mud, or sand, or whatever other material you’re blessed with, don’t despair! I can tell you that the trap was an instant success, I hardly got it set before my little honeybees were buzzing around their sticky new work. And they’ve been happily playing outside now for an hour, which is what gave me the time to tell all you lovely people about this fun activity.

Snow isn’t just for sledding, snow ball fights and snow angels.

How to set up a snow kitchen:

  1. Observe, make sure your kids will enjoy this activity by watching to see what interests them. Mine are excited about mixing, colors, building and making forms right now so I included objects for this.
  2. Find something elevated that won’t be ruined by water. (We have this old desk that came with our house. It’s in terrible shape and so I have repurposed it for outdoor use.)
  3. Find household objects that will meet your children’s needs and place them on the outdoor space. Make sure your children can see it from indoors or casually mention it. You could even take a quick photo and show it to them (though if they are reluctant learners I would say it’s a photo of the shed, or of the dog, or something else in the picture and let them discover the trap hidden in the background!)
  4. Continue to observe, what is used, what isn’t? Add to and subtract from the items to keep it interesting.

Remember, if you don’t catch any learners on your first try, it’s OK. You just need to observe a little longer and make small changes until you get the formula just right. Happy learning and good luck!

What’s a Learning Trap?

You can’t force a child to learn, but you can entice them to explore.

Do you have a child who is reluctant to learn? Have you spent hours working on engaging lesson plans only to be completely, and repeatedly, rejected by this child?

And I do mean rejected, because that is exactly how it feels when you put your heart and soul into a lesson plan–one that you are so sure is going to make learning FUN– only to experience flat refusal from said child.

Whether you are a seasoned educator, a brand new teacher or a homeschooling parent, that sinking feeling is the exact same. But let me encourage you to set aside those feelings of rejection, and focus instead on the child who is doing the rejecting. What is going on with this child?

The answer may not be about your careful lesson plans at all. The rejection may be happening for a number of reasons, and the only way to solve the mystery is to go back to square one and observe the child for a while. Here are a few reasons that children resist learning, which I’ve discovered in my observations of this issue:

1. The child feels pressure to perform perfectly.
2. The child is very dreamy and is not interested in anything remotely related to what they perceive as “school.” (Sometimes this child is simply too young for formal education.)
3. The child has had a bad experience with education and feels defensive about learning.

Do any of these examples fit with the child in your life? If so, I have great news for you–I have a trick up my sleeve that works 99.99 percent of the time. I call them learning traps, and they are very effective at grabbing the attention of reluctant learners.

Setting the Trap
Learning traps are strategically and sneakily placed, sticky learning materials, which are sure to grab the attention of a specific child. To set the trap, you must first really get to know this kid. What is interesting to her, what does he love, how does she think? Watch the child carefully for at least a week, and take notes. When do they engage? At what point do they tune out? Remember, you’re going to make this learning opportunity super sticky and irresistibly inviting, so don’t skip ahead of the observing step. If you do, you’re sure to fall into the pit of rejection again, and no one is happy in that pit.

Once you’ve collected your data you’re ready to start setting the trap. The next step is crucial. Do not set this activity up the way you ordinarily would, everything about this activity must be novel and interesting. So if you use the Montessori method, throw caution to the wind and put the trays away. Don’t set things up all tidy on the shelf and hope that the child will pick it up–that wasn’t working, remember? Traditional educators, don’t set up a learning center like you usually do. We have to think outside of our usual boxes for the sake of the child! Fear not, we are going to break all the rules (or at least the ones that are not working), but we are going to maintain our principles.

I can’t tell you exactly how to set your trap because it will vary for each child. However I can give you some pointers to help you get started. Here are some things that have worked for us in the past:

Sometimes moving an activity outdoors helps!
  1. Place your learning materials in a highly visible area, where the child can’t help but run across it. It may take a few tries to find the perfect spot in your home or classroom. Don’t be discouraged, these things take time.
  2. Sit quietly and do the work yourself, narrating as you go. Make obvious mistakes and puzzle over them–some children can’t resist being “teachers” and are very helpful to their poor learning guides who can’t seem to figure out the activity on their own.
  3. Leave very detailed instructions and examples of how the work should be done, either written or with photo sequencing for the perfectionist child. Be extra careful never to praise this child for their perfect work, but instead praise them for the process.
  4. Leave the activity half-way complete, some children love to finish what someone else has begun.
  5. For the child who “hates school” make the invitation to learn low-pressure and playful. Very young children may just not yet be ready for structured, academic learning–go against the grain and be OK with this! Celebrate that this child is determined to protect her childhood. Make the trap extra sticky by making it play-based. Practical life skills and gross motor activities are often very appealing to a child with this mindset.
  6. Take the work outdoors. Most children let down their guard when they are outside in nature! If you can incorporate natural items from your environment, even better.
  7. And don’t forget to watch and take notes. If the child ignores your trap, you haven’t made it sticky enough. If they engage briefly, celebrate the small victory and capitalize on whatever part of the learning material they interacted with. Build on the small victories until you know just what will catch this child’s attention.

So there you have it, my fool-proof, sure-fire, sticky and strategic method for catching even the most reluctant learners. Don’t give up on these children, they need you to gently guide them into a lifelong love of learning. If you carefully observe and prepare, you’re sure to catch a little learner of your own.

Questions? Comments? Need help brainstorming solutions for your child? I’m happy to help. Leave a comment, email me or find me on facebook and IG @branchtobloom.